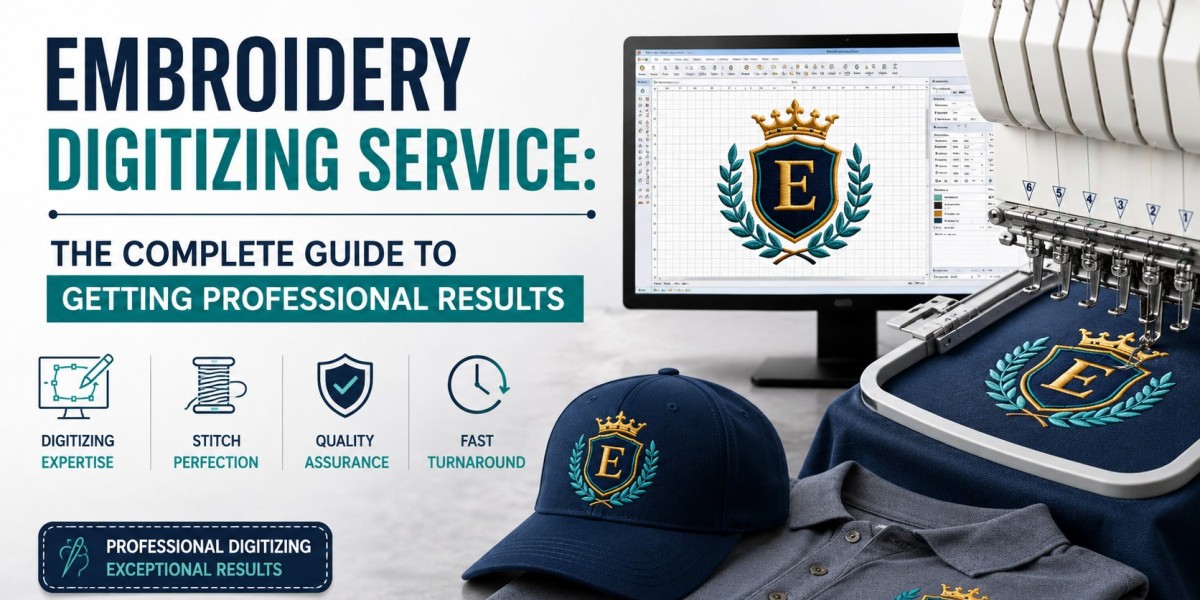
Whether you run a promotional merchandise company, a custom apparel brand, or simply want your logo stitched onto uniforms and caps, an embroidery digitizing service is the bridge between your artwork and the embroidery machine. Without accurate digitizing, even the most stunning logo can turn into a blurry, thread-tangled mess on fabric.
In this complete guide, we break down everything you need to know — what embroidery digitizing is, how the process works, which file formats matter, and how to choose the right service provider to get crisp, professional results every time.
What Is an Embroidery Digitizing Service?
An embroidery digitizing service converts your artwork — a JPG, PNG, PDF, or vector file — into a machine-readable stitch file. Trained digitizers use specialized software such as Wilcom or Hatch Embroidery to map out every stitch path, stitch type, underlay, and pull compensation so the final embroidered product looks identical to your original design.
The output is a format like DST, PES, JEF, VP3, or EXP — each tailored to specific embroidery machine brands such as Tajima, Brother, or Barudan. Without this conversion, the machine simply cannot read your design.
Why Professional Embroidery Digitizing Matters
Poorly digitized files lead to thread breaks, fabric puckering, misaligned columns, and wasted material. A professional embroidery digitizing service accounts for several technical variables that automated software conversion cannot handle:
Stitch density appropriate for the fabric type — caps, towels, or jackets each behave differently
Underlay stitches to stabilize fabric before top stitches are applied
Pull compensation to prevent satin stitches from appearing too thin after fabric tension
Proper sequencing to minimize thread trims and machine stops
Color sorting to reduce needle changes on multi-needle machines
Getting these elements right is the difference between a clean, durable embroidered logo and one that falls apart after the first wash.
The Embroidery Digitizing Process: Step by Step
Step 1 — Artwork Submission
You submit your artwork to the digitizing service. The cleaner and higher-resolution your file, the better. Vector files (AI, EPS, SVG) are ideal because they scale without quality loss. Most professional services can also work from bitmap images at 300 DPI or higher.
Step 2 — Design Analysis
The digitizer evaluates the artwork for complexity — number of colors, fine lines, small text, gradients, and intended placement on the garment. They determine which stitch types to use: satin stitch for borders and lettering, fill stitch (tatami stitch) for large areas, and run stitch for fine details.
Step 3 — Digitizing in Software
Using embroidery software like Wilcom, Hatch, or CorelDRAW with embroidery plugins, the digitizer maps every element of the design into stitch data. This is as much an art form as a technical process — experienced digitizers make micro-adjustments that automated tools miss entirely.
Step 4 — Test Sew-Out
Before delivering the file, reputable services run a physical or simulated sew-out to catch errors. A test sew-out on the intended fabric reveals puckering, misregistration, or density issues before production begins.
Step 5 — File Delivery
You receive your stitch file in the requested format — DST for Tajima machines, PES for Brother, JEF for Janome — along with a thread color reference in popular systems like Madeira or Robison-Anton.
Common Stitch Types in Embroidery Digitizing
Satin Stitch — parallel stitches side by side; ideal for lettering and thin shapes
Fill / Tatami Stitch — layered rows covering large areas; used for backgrounds and bold logos
Run Stitch — single-path stitches for fine details, borders, and underlay
3D Puff Stitch — foam placed under stitches to create a raised, dimensional effect; popular on caps
Cross Stitch — decorative X-pattern used for artistic or vintage-look designs
Embroidery File Formats You Should Know
Different embroidery machines require different file formats. Always specify the format your machine reads when ordering a custom embroidery digitizing service:
DST — Tajima; the most universally accepted industrial format
PES — Brother and Babylock home and commercial machines
JEF — Janome machines
VP3 — Husqvarna Viking and Pfaff machines
EXP — Melco machines
XXX — Singer and compatible machines
Most professional digitizing services deliver multiple formats in a single order so you are covered regardless of which machine your embroiderer uses.
How to Choose the Right Embroidery Digitizing Service
Experience and Portfolio
Ask to see samples of previously digitized work — particularly designs similar to yours in complexity. Look for clean edges, consistent stitch density, and sharp lettering at small sizes.
Turnaround Time
Standard turnaround for most professional services is 24 to 48 hours. Rush services deliver in 4 to 12 hours for an additional fee. If a provider promises instant automated digitizing, be cautious — quality digitizing requires human expertise.
Revision Policy
A reputable embroidery digitizing service will offer free revisions if the sew-out does not match the approved artwork. Clarify this policy before placing an order.
Pricing Structure
Most services charge a flat rate per design based on complexity and stitch count — typically between $10 and $50 for a standard logo. Be cautious of services charging per stitch, as costs can inflate unpredictably on complex artwork.
Supported Formats and Fabric Types
Ensure the service has experience digitizing for your intended substrate — structured caps, soft knit shirts, denim jackets, or terrycloth towels. Each fabric behaves differently under the needle.
Pro Tips for Best Results
Always request a sew-out proof on your actual fabric before bulk production
Avoid fonts smaller than 6mm in height — they tend to close up in stitching
Provide a vector or high-resolution file of your logo for cleaner digitizing
Specify your machine brand and model to get the correct file format
Store your digitized files securely — losing them means paying to re-digitize
Conclusion
An embroidery digitizing service is an essential investment for anyone serious about high-quality custom embroidery. The right digitizer transforms your brand's artwork into a durable, professional stitch file that performs flawlessly on any machine — from home units to industrial multi-head systems.
By understanding the process, knowing the file formats, and choosing a provider with proven expertise, you set every embroidery project up for success from the very first stitch. Whether you need a one-time logo digitization or ongoing support for a growing merchandise line, partnering with a skilled embroidery digitizing service is one of the smartest decisions you can make for your brand.