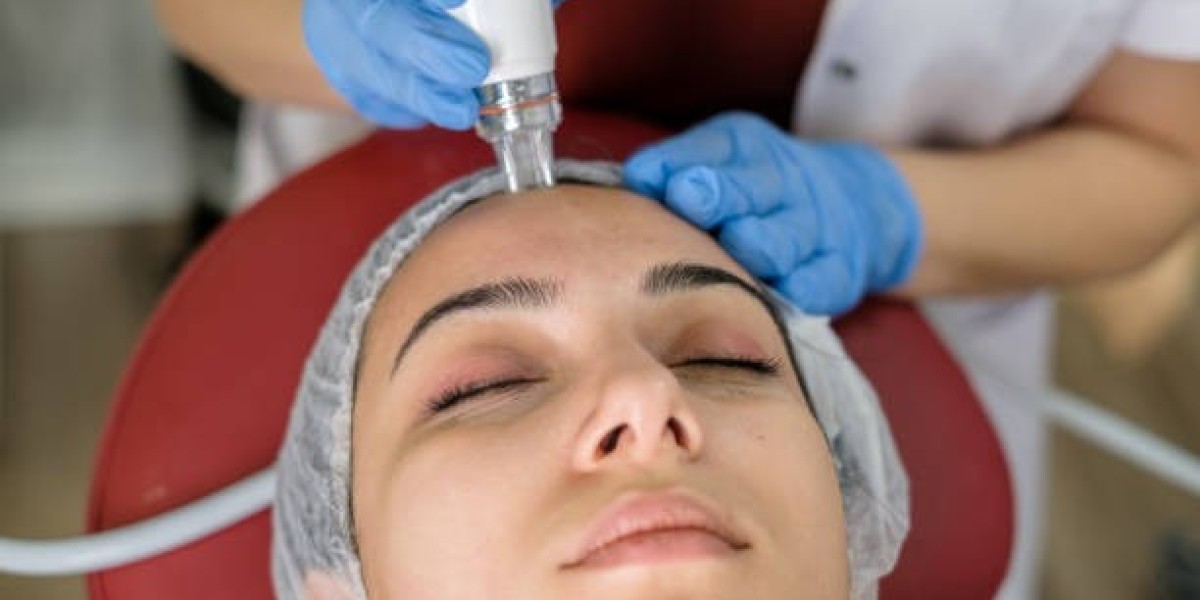
Are you craving that radiant, deeply cleansed glow from a professional Hydrafacial but want to skip the salon chair? Professional treatments deliver impressive results through advanced technology like vortex suction and customized serums, leaving skin hydrated, exfoliated, and plump. HydraFacial session in Riyadh (جلسة هيدرافيشل للوجه في الرياض). Yet, replicating key elements at home can yield surprisingly effective results without stepping out
Imagine achieving similar benefits—gentle exfoliation, pore extraction, and intense hydration—using everyday ingredients and affordable tools. This guide dives into proven DIY alternatives to professional Hydrafacial , empowering you to transform your skincare routine. Whether you're battling dullness, congestion, or dryness, these methods mimic the multi-step process safely and affordably.
In Riyadh , where desert climates can wreak havoc on skin, Hydrafacial has emerged in popularity for its quick, no-downtime refresh. Bolded for emphasis: Hydrafacial in Riyadh offers a tailored solution amid harsh sun and dry air, but home hacks provide accessible entry points. Let's explore how to harness these at-home rituals for glowing results that rival salon sessions.
What Makes Hydrafacial So Effective?
Hydrafacial stands out with its patented Vortex-Fusion technology, blending cleansing, exfoliation, extraction, and hydration in one seamless treatment. It uses a specialized wand to painlessly remove impurities while infusing antioxidants and peptides deep into the skin. This non-invasive approach suits all skin types, delivering immediate luminosity without irritation.
The magic lies in its four core steps: cleanse and exfoliate to slough off dead cells, extract debris from pores, hydrate with hyaluronic acid, and protect with serums. Users rave about reduced fine lines, minimized pores, and even tone post-treatment. Understanding this blueprint lets you replicate it DIY-style, targeting the same skin concerns effectively.
Professionally, sessions last about 30 minutes, but at-home versions extend into relaxing rituals. By mimicking each phase, you'll unlock comparable hydration and clarity, building a consistent routine that enhances natural skin resilience.
Why Choose DIY Hydrafacial Alternatives?
Busy lifestyles demand flexible skincare, and DIY options fit perfectly—no appointments needed. These alternatives save time while empowering you with control over ingredients, ideal for sensitive skin or budget-conscious routines. Plus, they encourage experimentation, fostering a deeper connection to your skin's needs.
In arid regions like Riyadh, where pollution and heat accelerate aging, home treatments provide frequent maintenance between pro sessions. They address common queries like "how to get Hydrafacial benefits at home," aligning with user intent for practical, educational advice. Expect gradual yet visible improvements in texture and glow.
Safety first: always patch-test ingredients to avoid reactions. These methods use gentle, natural elements, making them beginner-friendly while delivering spa-like satisfaction.
Step-by-Step DIY Hydrafacial Routine at Home
Recreate the pro experience with this easy, four-phase routine. Perform it weekly for optimal results, using clean hands and tools to prevent contamination.
Phase 1: Cleanse and Exfoliate Gently
Start with a mild cleanser to remove surface dirt, followed by a homemade exfoliant. Mix 1 tablespoon oatmeal (finely ground for gentle abrasion) with yogurt for lactic acid exfoliation. Apply in circular motions for 2 minutes, then rinse.
Oatmeal mimics the treatment's alpha hydroxy acids, dissolving dead skin without harsh scrubs. Yogurt adds probiotics for soothing, prepping pores for deeper work. This step reveals fresher skin instantly.
Phase 2: Extract Impurities Like a Pro
Simulate vortex extraction using a warm steam facial. Boil water with chamomile tea bags, drape a towel over your head, and steam for 5-10 minutes. Follow with a clay mask—bentonite or kaolin mixed with apple cider vinegar—to draw out blackheads.
Steam softens sebum, while clay absorbs excess oil, clearing congestion painlessly. Gently press a clean cloth over problem areas for manual extraction if needed, avoiding aggressive squeezing.
Phase 3: Hydrate and Infuse Nutrients
Hydration is key—whip up a sheet mask from aloe vera gel and cucumber juice. Blend, strain, and soak a cotton sheet, applying for 15 minutes. Boost with a hyaluronic acid serum patted in afterwards.
Aloe provides cooling moisture, cucumber reduces puffiness, echoing professional boosters. This infuses skin with water-binding humectants, plumping from within for that dewy finish.
Phase 4: Protect and Glow
Seal with a natural oil like rosehip or jojoba, rich in vitamins A and C. Massage lightly to lock in moisture and promote collagen. Finish with sunscreen daily to shield gains.
This antioxidant layer protects against environmental stressors, prolonging results like a pro treatment.
Best Ingredients for Your DIY Hydrafacial Kit
Stock these pantry staples for endless variations:
Exfoliants : Oatmeal, sugar, or coffee grounds for texture.
Extractors : Bentonite clay, charcoal powder.
Hydrators : Aloe vera, honey, glycerin.
Boosters : Vitamin C from lemon (diluted), green tea for antioxidants.
Tailor to skin type—oily skins love tea tree oil, dry ones crave shea butter. These powerhouses replicate clinical serums effectively.
Tools to Elevate Your At-Home Hydrafacial
Invest in user-friendly gadgets without breaking the bank:
Facial steamer or hot towel for extraction.
Silicone brush for even exfoliation.
Jade roller to enhance serum absorption.
LED mask for bonus anti-inflammatory effects.
These amplify results, bridging the gap to professional precision. Clean them religiously for hygiene.
Benefits of DIY vs. Professional Hydrafacial
DIY shines in convenience and customization, offering daily tweaks for evolving needs. It builds skincare literacy, reducing reliance on experts. Results accumulate over time, with softer skin and fewer breakouts.
Professionals excel in depth—stronger suction and medical-grade serums—but DIY sustains those gains affordably. Combine both for hybrid success: pro every 4-6 weeks, home weekly.
Real users report 70-80% similarity in glow, per anecdotal feedback, making it a smart starter.
When to Book a Professional Consultation
DIY empowers, but pros handle stubborn issues like deep scarring or rosacea. For personalized advice in Riyadh, book an appointment consultation clinic like Enfield Royal Riyadh ( إنفيلد رويال الرياض ) to elevate your routine safely.
Consultations assess your skin holistically, blending home hacks with tailored tech.
FAQs
Can DIY Hydrafacial replace professional treatments entirely?
No, but it maintains results effectively between sessions, offering 70-80% of the glow for daily use
Is DIY Hydrafacial safe for sensitive skin?
Yes, with gentle ingredients like aloe and oatmeal—always patch-test to confirm.
How often should I do a DIY Hydrafacial at home?
Once weekly prevents overdoing it, aligning with skin renewal cycles.
What skin concerns does DIY Hydrafacial best address?
Dullness, clogged pores, dehydration, and mild acne respond quickest.
How to store DIY Hydrafacial mixtures?
Refrigerate in airtight jars for up to 3 days; make fresh batches for potency.