3D printing is an exciting and transformative technology, but achieving perfect prints consistently can be challenging. Even with high-quality printers like Prusa, beginners and advanced users alike may encounter issues that lead to failed prints. Fortunately, with careful use of the Prusa 3D Slicer and attention to calibration, many of these failures can be minimized. This guide offers essential tips to reduce print failures, focusing particularly on addressing the prusa z offset calibration problem and other common slicing concerns.
Understanding the Importance of Z-Offset Calibration
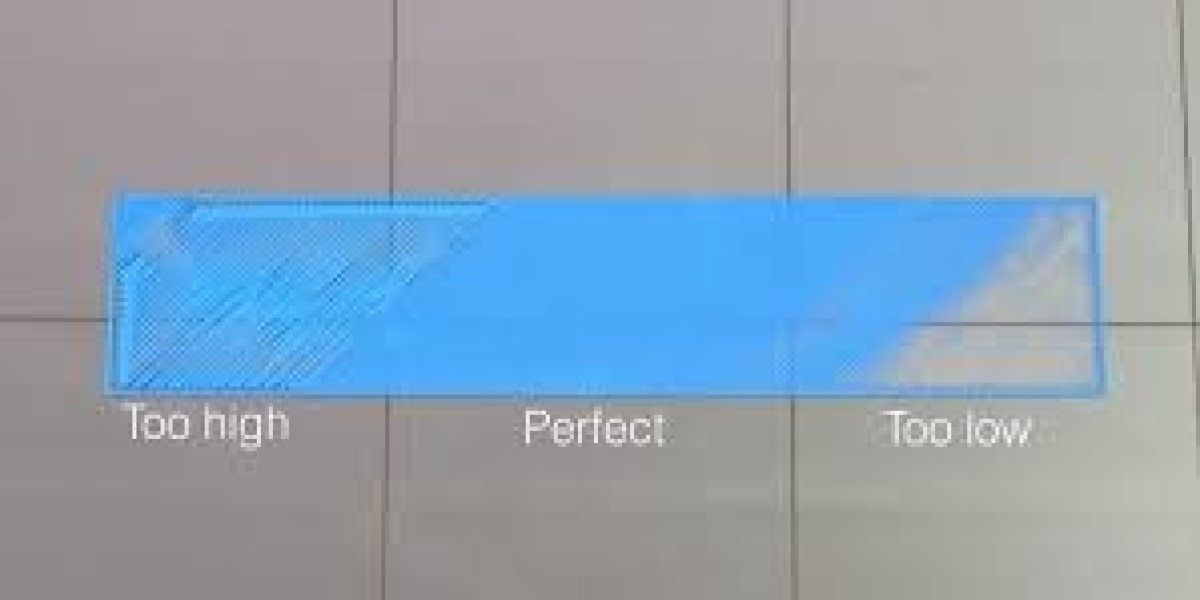
One of the most common reasons for failed prints is an incorrect Z-offset setting. The Z-offset determines the distance between the printer’s nozzle and the print bed at the start of a print. If the nozzle is too close to the bed, it can cause filament to squish excessively, leading to uneven layers or even nozzle clogs. Conversely, if it’s too far, the filament may not adhere properly, resulting in print lifting or warping. Addressing the prusa z offset calibration problem ensures the first layer is correctly laid down, which is critical for overall print success.
Prusa printers include built-in tools to help users calibrate the Z-offset, such as mesh bed leveling and live Z adjustments. However, even with these tools, slight inaccuracies can occur, especially if the bed surface wears over time or the printer is moved. By routinely checking and fine-tuning the Z-offset, you can drastically reduce the likelihood of print failures caused by first-layer issues, giving your prints a solid foundation.
Optimizing Layer Height and Print Speed
Another key factor in reducing print failures is selecting the proper layer height and print speed settings in Prusa 3D Slicer. A layer height that is too large can lead to poor layer adhesion, while excessively small layers may increase print time and cause thermal issues. Balancing these settings based on the filament type and model complexity is crucial for consistent results. Using standard presets in the Prusa Slicer for specific filaments can help prevent errors and save time.
Print speed also plays a significant role. Printing too fast can lead to under-extrusion, poor detail, or layer shifting, especially on complex or tall prints. By carefully adjusting speed settings for perimeters, infill, and supports, you can maintain better control over the extrusion process. Experimenting with different speeds while monitoring first layers can complement adjustments made for the prusa z offset calibration problem, ensuring your prints adhere correctly and maintain structural integrity.
Ensuring Proper Bed Adhesion
Poor bed adhesion is one of the primary causes of print failures. Even with correct Z-offset calibration, a print can fail if it does not stick to the bed properly. Preparing the print surface by cleaning it with isopropyl alcohol or using adhesives like glue sticks or specialized 3D printing sheets can greatly improve adhesion. Prusa 3D Slicer also allows users to add skirts, brims, or rafts to enhance the contact area and secure the base of the print.
Additionally, temperature management is crucial. Ensuring that the bed temperature matches the filament’s requirements helps the first layer bond effectively. For example, PLA usually benefits from a slightly warmer bed, while PETG requires careful temperature balancing to prevent sticking or stringing. Combining these adhesion techniques with a resolved prusa z offset calibration problem gives you a strong starting layer and dramatically reduces the risk of warping or detachment during the print.
Fine-Tuning Retraction and Extrusion Settings
Stringing, oozing, and uneven extrusion are frequent culprits behind print failures. Prusa 3D Slicer provides detailed control over retraction distance, speed, and extrusion multipliers. Adjusting these settings based on your filament type can minimize issues like blobs, gaps, or thin layers. For instance, PLA usually requires moderate retraction, while flexible filaments need more careful tuning to prevent clogging and inconsistent flow.
It’s also essential to calibrate your extruder steps per millimeter and check for proper filament diameter input in the slicer. Small discrepancies can accumulate over the length of a print, causing layer inconsistencies. By pairing optimized retraction and extrusion settings with proper prusa z offset calibration, you ensure that your printer deposits filament accurately, leading to smoother surfaces and more reliable prints.
Leveraging Prusa Slicer Features for Troubleshooting
Prusa 3D Slicer comes with several features designed to prevent print failures before they happen. Tools such as preview mode allow you to examine layer paths, detect overhangs, and identify potential weak points in your design. Using these features helps you make proactive adjustments to support placement, layer height, and infill patterns before printing, reducing the likelihood of errors.
Additionally, the slicer includes options for live Z adjustment and adaptive layer height, which can further compensate for small bed inconsistencies. By integrating these features into your workflow and addressing any prusa z offset calibration problem, you can monitor your print in real time and make on-the-fly adjustments. This proactive approach drastically improves print reliability and reduces wasted filament and time.
Conclusion
Reducing print failures with a Prusa 3D printer is largely about preparation and careful configuration. Resolving the prusa z offset calibration problem, optimizing layer height and print speed, ensuring proper bed adhesion, fine-tuning retraction and extrusion, and leveraging Prusa Slicer’s advanced features all contribute to more successful prints. By combining these strategies, users can achieve high-quality, consistent results and make the most out of their 3D printing experience.